
Make your own fieldwork equipment: Clinometer
Below is a step by step guide to making your own clinometer.
What you need
-
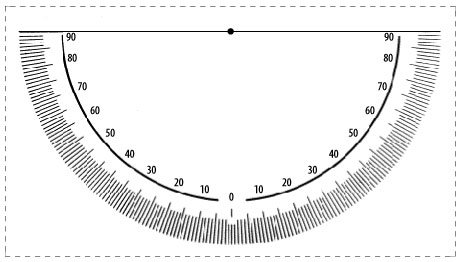
Clinometer template document
-
Sheet of thin cardboard
-
Straw
-
Lollipop stick
-
Thread
-
Blu-tak
-
Tape
What you do
Download your clinometer template and print it out onto thin cardboard.
Cut out your template, leaving approximately half a centimetre above the horizontal line on the straight edge.
Tape a length of straw to the top of your cardboard clinometer template.
Tape a lollipop stick to the reverse of the clinometer template - this will give it added strength.
Make a small hole in the centre of the horizontal line on the straight edge of the template (just below the straw) and tie a length of thread through, leaving about 15cm dangling. Alternatively you can tie the thread around the centre of the straw.
Tie the loose end of thread around a small ball of blu-tak.
Adjust the thread so that it hangs down the front of the clinometer template.
How to use it
Just like any other clinometer.
Pair up with somebody around the same height as you.
Find a gradient you want to measure the angle of.
You stand at one point with the clinometer, they stand at the other point.
Look through the straw and fix your sight on their eye level (or the top of their head if you're a bit taller than them).
Read the angle of the gradient from your clinometer using the thread as an indicator. You might need a third person around to help you to read the angle while the clinometer is still fixed to your eye.