Journey of a River
In this lesson pupils will learn that rivers have their source in high land, and follow a journey that ends at the river mouth- typically an estuary flowing into the sea
Rivers, and the landscape that surrounds them, have different characteristics as they move from the upper course, into the middle and lower course.
Use the PowerPoint presentation in conjunction with the Lesson Plan. The PowerPoint presentation follows the sequence of the lesson and contains the photographs and images that illustrate the main teaching points. The Factsheet, to accompany this lesson also explains some of the main points in more detail.
Key Objectives
To understand how rivers are formed.
To understand that the features of a river and the surrounding landscape change from source to mouth.
Web Links
-
To ensure prior knowledge of the water cycle go to Crickweb
-
To download Google Earth
Starter
Begin the lesson by showing pupils photographs of the River Severn. Each photograph shows the river at different points its course. Do not contextualise the photographs.
Ask pupils to identify enquiry questions: what, where, when, why, how.
-
What are the photographs showing?
-
What does the landscape look like?
-
What features can be seen?
-
Is the surrounding land steep or flat?
-
Is the river bed narrow or wide?
-
How does the water change? Is the water turbulent or calm?
-
What is the evidence that these bodies of water are rivers? (The photograph of the estuary could be thought of as coastal)
Establish that the photographs are of the same river, the River Severn – the UK’s longest river. Explain that a river can take on different characteristics at different points in its course. These photographs show the River Severn in the upper course, middle course and at the lower course – where the Severn Estuary becomes tidal and eventually flows into the Bristol Channel. Pupils may notice that the mud flats which signify that the tide is out. Locate the River Severn on Google Earth, or use an atlas.
Main Activity
Reiterate that rivers can be divided into stages, the upper course, middle course and lower course.
The Upper Course:
Show pupils photographs illustrating the upper course. What can they see?
The source of a river is often in upland areas. Here, high levels of precipitation (rain and snow) combined with steep slopes and sparse vegetation result in water flowing overland.
In the upper course the river bed is narrow and rocky. As it moves over rocks, the water becomes turbulent and appears fast-flowing. The water has enough energy to transport boulders and rocks in its swift current.
The river erodes downwards carving the valley floor. As the valley deepens the sides become unstable and collapse. Over time this leads to the formation of V-shaped valleys.
Waterfalls are also a feature of the upper course. The river can erode layers of soft rock, leaving behind an over-hang of harder rock. (The formation of waterfalls will be covered in greater depth in Lesson five).
Eventually, tributaries join together, feeding into the river, increasing its width and speed as it moves downhill.
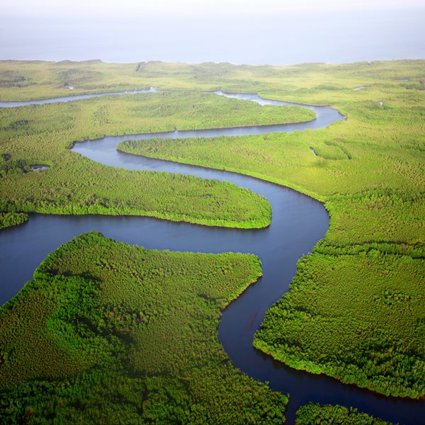
The Middle Course:
As the land becomes flatter the river moves into its middle course. The river becomes wider and deeper and begins to loop and curve, or meander. The photograph of the meander on the River Cuckmore and the flat land near the River Itchen illustrate this well. You may also like to use Google Earth to see if you can show pupils a meander of a river near your school.
In the middle course the shape of the river is under constant change. The water erodes, transports and deposits soil and other material.
Erosion: This causes the wearing away of the river bank and river bed. Erosion occurs on the outside of the meander where the water is moving at its fastest. The water can also carve out, or undercut the river bank, taking rocks and soil away and leaving the river bank prone to collapse.
Transportation: Eroded material is then taken away downstream.
Deposition: Any eroded material is finally deposited. Deposition occurs on the inside of a meander, where the water is moving slowly.
Oxbow lakes: As the river moves from the middle to the lower course the meanders can become more pronounced. Rivers can now make extreme loops. Eventually, with continued erosion, these loops join together. Finally, the river will take a straighter, more efficient course, cutting off the meander altogether. An oxbow lake is formed. Eventually the oxbow will dry up.
Show pupils the photographs of the oxbow lakes in formation. In the first photograph the river is taking a straighter course but the oxbow is not yet isolated. In the second photograph the oxbow has separated from the main river- you will also notice a meander to the north. Ask pupils what they predict will happen.
The Lower Course:
The land is very flat, with gentle, wide valleys – we are nearing sea level. The river will be at its widest here. Many rivers have estuaries, which are characterised by wide, flat land and a wide channel as the river flows into the sea. Deposition occurs at the estuary where the river deposits large amounts of material. At low tide this material a mixture of find sediment and mud is exposed. However, with the high tide these deposits are washed away by the sea.
The Journey of a River: From the PowerPoint, show pupils the diagram of the Journey of River. Ask pupils to recap the features that they can see depicted on the diagram, starting from the source of the river in the highland, through to the mouth of the river.
Pupils draw a diagram depicting the journey of a river. The diagram should be annotated. Expect higher ability pupils to annotate their diagram with greater detail. They could also include smaller additional diagrams, at each relevant stage, to show erosion and deposition on a meander or the stages in the formation of oxbox lakes. Examples of pupils’ work are provided (see downloadable resources).
Alternatively, pupils could make a 3-dimensional model of the course of a river. A photograph of a model is also provided (Journey of a River 3D Model; see downloadable resources)
Plenary
Using the photographs and labels provided in the Journey of a River plenary activity (see downloadable resources), ask pupils to become a class river. Pupils need to arrange themselves from source to mouth, ensuring that the correct geographical features are depicted in order and the labels situated at correct points along the river’s course. Ask pupils what other labels they could add and where they would situate them, for example there are no labels for erosion, transportation and deposition.
Homework:
Pupils should use an atlas to name and locate the longest rivers in each continent. Also, expect pupils to include countries and/or cities in which the source and mouth of each river is located. Pupils should also name the five oceans.
File nameFiles
File type
Size
Download